Wooden Block Christmas Tree

 Wooden Block Christmas Tree
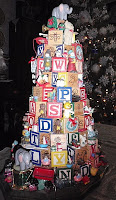
This is something I made many years ago, however it still comes out every year as a centerpiece on the coffee table in the parlor. This is the first one I ever made, back in 1999.
I can't begin to count how many of these I have made over the years. I thought that I would share how to make them with all my blogger friends!
I started with a wooden plaque as a base. You could use just about anything that is flat. You need a good supply of the 1" square wooden blocks. Sometimes you can get lucky and find them at the dollar stores. I begin by figuring out what I want to spell out. Each layer of this tree spells out something. I have the names of the children, the pets and different words that relate to Christmas. Each tree is personalized for whomever I make them for. Once you have your words figured out, arrange them from the longest word to the smallest. You want the larger words on the bottom and then you work your way up.
You can use hot glue, however I find that E6000 stands the test of time much better. Hot glue tends to allow items to fall off over time. I've never lost anything yet with the E6000!
Build your first row by creating a circle with your longest word on the plaque. If you have extra space, just use the side of the block that has a shape on it. Each row gets added by making them smaller by one or two blocks, depending on how tall you want the end result to be. Try to space them a little off-center so that you will have a lot of little cubbyholes to glue your miniatures to. Once you reach the middle of the tree, start stuffing crumpled paper, shredded paper or whatever you want, in the center, in order to help it keep its shape while drying. You "can" use a styrofoam cone shape however I find that the natural color of brown paper bags is less conspicuous. Add the final top layers and let the tree dry for several hours.
Once the blocks are dry, start to add your miniatures wherever you want them. If I have miniatures that relate to hobbies of the person's name on a particular layer, I try to put them there. I find my miniatures in the hobby shops, doll house shops, craft stores and floral stores. You can find tons of them on eBay and Etsy as well. Try not to use too much of the E6000 glue, a little goes a long way.
Once it is all done, sit back and enjoy the many compliments you will get. There is always something different for people to look at and admire. When the holiday season is over, I put a plastic bag over it and store it carefully.
I hope you enjoyed the "tutorial" and have fun making your own special holiday tree!
Merry Christmas to all my friends around the world!
~Linda


I love this idea Linda! Thanks for sharing it. :) Jan K.
ReplyDelete